So here's the first, modelled by the astonishingly cute Rowan.
Rowan's Wristies
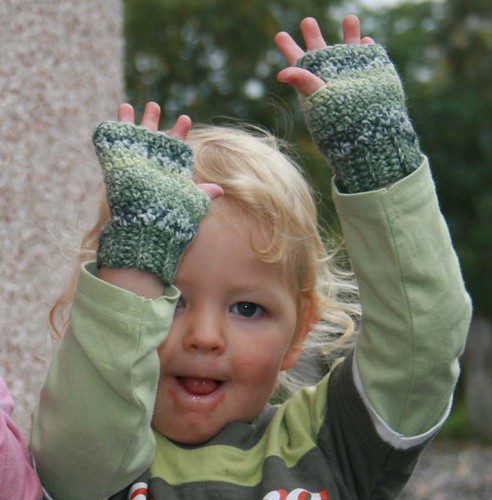
Size: Toddler - 1-3 years
Yarn: James C Brett Magi-Knit With Wool DK
Hook: 3.5mm
Gauge: 18 sts & 14 rows to 10cm in pattern
Please note that pattern uses US terminology.
Cuff:
Chain 8.
Row 1: 1 half-double crochet (hdc) in 2nd chain from hook, 1 hdc in each chain to end (7 sts).
Row 2: 1ch (does not count as stitch), 1 hdc in back loop only of each st to end (7 sts).
Rows 3-14: Repeat row 2.
Break yarn & either sew or slip-stitch foundation row to last row to form ribbed cuff.
Hand:
You will now work in the round, working stitches around the posts of the hdcs along the edge of the cuff.
Attach yarn at any point on cuff edge.
Row 1: Ch 1 (does not count as stitch). [1 double crochet (dc), 1 extended single crochet* (esc)] around the post of each hdc along cuff edge (28 sts). DO NOT JOIN
Row 2: [1 esc in next dc, 1 dc in next esc] to end (28 sts). DO NOT JOIN.
Row 3: [1 dc in next esc, 1 esc in next dc] to end (28 sts). DO NOT JOIN.
Rows 4 - 5: Repeat rows 2 & 3 once each.
Row 6: Repeat row 2.
Work thumb hole:
row 7: [1 dc in next esc, 1 esc in next dc] 6 times, chain 3, skip next 5 sts, 1 esc in next dc, [1 dc in next esc, 1 esc in next dc] to end. DO NOT TURN.
Row 8: [1 esc in next dc, 1 dc in next esc] 6 times, 1 esc in next ch, 1 dc in next ch, 1 esc in next ch, 1 dc in next esc, [1 esc in next dc, 1 dc in next esc to end (26 sts). DO NOT TURN.
Row 9: Repeat row 3.
Row 10: Repeat row 2.
Slip stitch into next stitch. Fasten off yarn & weave in ends.
Make another :0)
* Extended single crochet - insert hook through next stitch, yarn round hook & draw through stitch (2 loops on hook), yarn round hook & draw through 1 loop (2 loops on hook), yarn round hook & draw through all loops on hook. There's a good video of this here.
This is a really easy & fast glove pattern which can be customised to fit anyone using just about any yarn (I know - I've made lots). To make it wider just increase the number of cuff rows. To make it longer just work extra rows both before & after working the thumb-hole. To make a bigger thumb-hole just skip more stitches (always be sure to chain 2 less than the amount of stitches you've skipped).
This is the basic pattern sized up for a ladies glove & with a celtic knot motif added to the cuff & a picot edge - very simple but very effective -
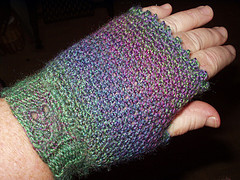
Thanks to Hilary for use of the photo.
Some hints -
This works well with the jacquard-print yarns that are usually designed for knitting rather than crochet - just make sure you start each glove at the same place in your yarn or the pattern sequence won't match up.
Use fingering-weight yarn for a lacier look or aran/worsted -just be sure to use an appropriate hook for heavier yarns (you wants a nice cosy but not stiff fabric).
Add different edgings for more girlie gloves; picot works well - [ch 1, 1 dc in same stitch, ch 3, 1 dc in first of 3 ch, 1 dc in next stitch] repeat to end.
Finally, have fun & please be sure to let me see pics of your finished gloves - I can be found here & on ravelry; just search for cherryred :0)
Here's the legal bit -
This is a free pattern, for personal use only & was created by & belongs to me, Shirley MacDonald. You may use this pattern to make items for your own use or for gifts. You may not sell this pattern or use this pattern to make items for sale/profit. If you would like to use this or any other of my free patterns to make items for sale for charity, please contact me first. If you do use this pattern please give me design credit, linking to my blog where possible.
Thanks for visiting my blog & happy crafting.